
 Cart is empty

Save time, build a professional workflow, and make your favourite sounds instantly available in every project.
If you’ve ever finished crafting the perfect piano sound in Logic Pro X only to realise you’ll have to recreate it in your next project, you’re not alone. Every music producer has experienced the frustration of trying to remember the exact EQ curve, compressor settings, and reverb amount that made an instrument sound just right.
Fortunately, Logic Pro X offers a powerful feature that solves this problem: Channel Strip Settings.
A Channel Strip allows you to save your entire signal chain—including virtual instruments, EQ, compressors, reverbs, delays, saturation plugins, and routing—as a reusable preset. Instead of spending valuable creative time rebuilding your sounds, you can load them instantly with a single click.
Whether you’re producing worship music, orchestral compositions, film scores, pop songs, or building sample libraries, learning to create Channel Strips is one of the most valuable workflow improvements you can make.
Let’s dive in.
What Is a Channel Strip?
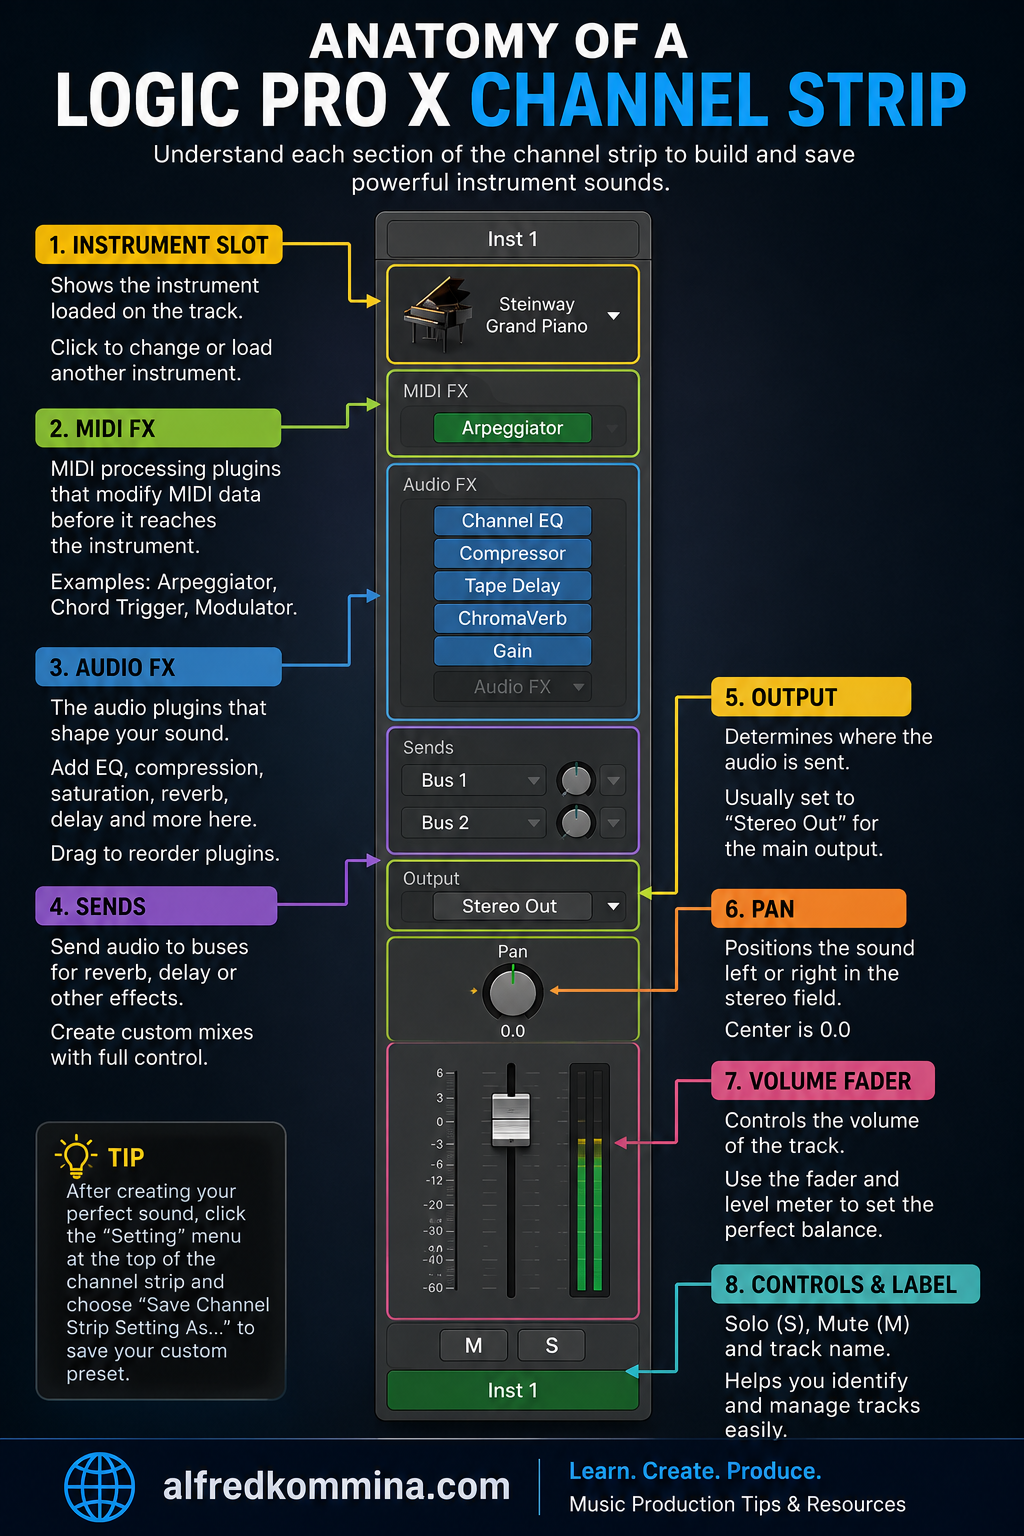
A Channel Strip is the complete processing path for an instrument or audio track inside Logic Pro X.
Rather than saving plugins individually, Logic saves everything that contributes to your sound, including:
- Software Instrument
- MIDI FX
- Audio FX Plugins
- Sends
- Bus Routing
- Pan
- Volume
- Output Assignment
Think of it as a complete recipe for your instrument’s sound.
For example, if you’ve created a warm worship piano using Channel EQ, Compressor, Tape Saturation, ChromaVerb, and Tape Delay, you can save all of those settings into a single Channel Strip preset. The next time you need that sound, simply load the preset instead of rebuilding everything from scratch.
Why Every Producer Should Use Channel Strips
As your projects become more complex, consistency becomes increasingly important. Creating custom Channel Strips allows you to maintain the same sonic quality across multiple songs while significantly speeding up your workflow.
Some of the biggest advantages include:
- Faster mixing sessions
- Consistent sound across projects
- Easy organization of favorite sounds
- Less repetitive work
- Professional production workflow
- Better focus on creativity instead of technical setup
Many professional producers maintain hundreds of custom Channel Strips for pianos, strings, basses, synths, guitars, drums, ethnic instruments, and vocals. Once you begin creating your own library, you’ll wonder how you ever worked without them.
Before You Begin
Before creating your first Channel Strip, make sure you have:
- Logic Pro X installed
- A software instrument track
- A virtual instrument loaded
- Basic familiarity with opening plugins
For this tutorial, we’ll create a Channel Strip for a piano, but the same process works for any instrument.
Step 1: Create a Software Instrument Track
Launch Logic Pro X and create a new Software Instrument track.
You can do this by selecting:
Track → New Software Instrument Track
or by pressing:
Option + Command + N
Choose your preferred instrument.
For this example, we’ll use the Steinway Grand Piano, although Kontakt libraries, Alchemy, Keyscape, Omnisphere, or any third-party instrument will work just as well.
Play a few notes to familiarize yourself with the raw sound before applying any processing.
Step 2: Listen Before You Process
One of the biggest mistakes beginners make is immediately adding plugins without listening carefully.
Play a few chords and ask yourself:
- Does the instrument sound muddy?
- Is it too bright?
- Does it lack warmth?
- Does it feel too dry?
- Does it need more punch?
Every plugin should solve a specific problem.
Avoid adding effects simply because everyone else does.
Step 3: Shape the Tone with Channel EQ
The first plugin you’ll usually insert is Channel EQ.
Click the first Audio FX slot and select:
EQ → Channel EQ
The Channel EQ gives you complete control over the tonal balance of your instrument.
For a piano, try these beginner-friendly adjustments:
- High-pass filter below 40 Hz to remove unnecessary rumble
- Slight cut around 250 Hz to reduce muddiness
- Gentle boost near 3–4 kHz for clarity
- Small high-shelf boost around 10–12 kHz for sparkle
The goal isn’t to drastically change the sound—it’s to enhance what already sounds good.
Remember that subtle adjustments usually produce the most natural results.
Step 4: Add Compression for Consistency
Next, insert a Compressor.
Choose:
Dynamics → Compressor
Compression helps control the dynamic range of your instrument, making quiet notes more audible while preventing louder notes from becoming overwhelming.
For beginners, try these settings:
- Threshold: -18 dB
- Ratio: 2:1
- Attack: 25 ms
- Release: 100 ms
Play several passages while switching the compressor on and off.
If the instrument sounds more controlled without losing its natural expression, you’re moving in the right direction.
Step 5: Add Warmth with Saturation
Digital instruments sometimes sound too clean or sterile.
Adding a small amount of saturation introduces harmonic richness and makes the sound feel more analog.
Insert:
Distortion → Soft Saturation
or
Phat FX
Use very conservative settings.
The purpose is warmth—not distortion.
When used correctly, saturation is something listeners feel rather than hear.
Step 6: Create Space with Reverb
Now it’s time to place your instrument into an acoustic environment.
Insert either:
- ChromaVerb
- Space Designer
For a realistic piano sound, try:
- Medium Room
- Decay between 1.5 and 2.5 seconds
- Wet Mix around 10–20%
Too much reverb quickly makes an instrument sound distant and muddy.
A little ambience usually goes much further than you expect.
Step 7: Add Delay (Optional)
Delay isn’t necessary for every instrument, but it can add depth and dimension.
Insert:
Delay → Tape Delay
For a natural piano sound:
- Short Delay Time
- Low Feedback
- Mix below 10%
Use delay creatively rather than constantly.
Sometimes leaving it out entirely produces a cleaner mix.
Step 8: Organize Your Plugin Chain
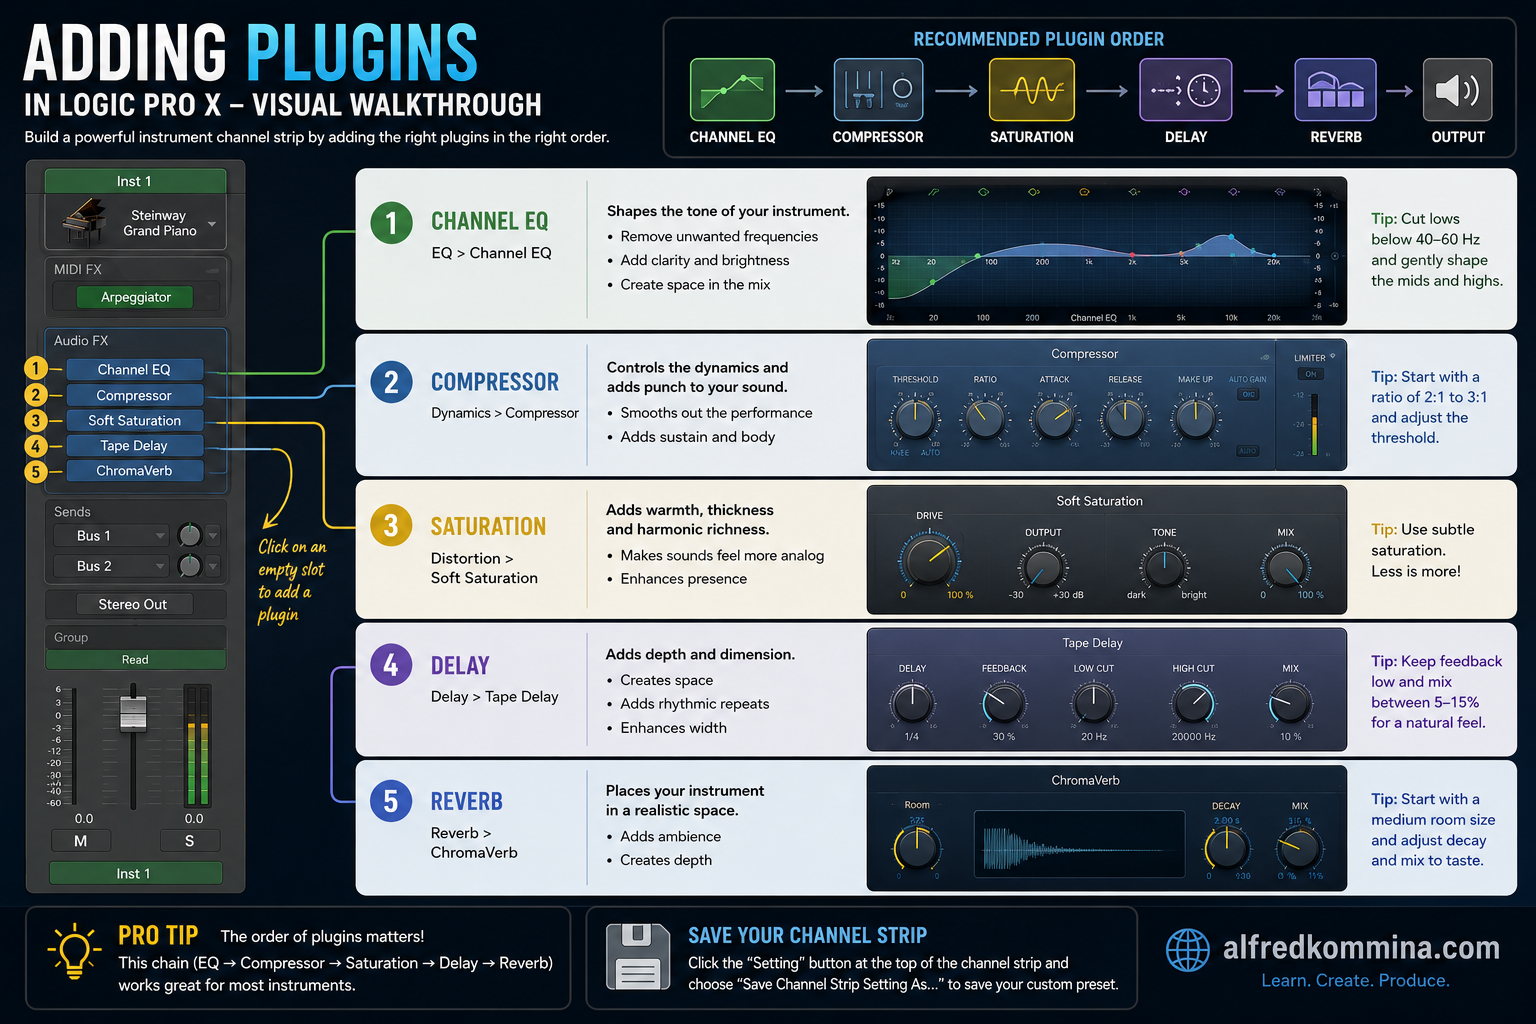
Although there are countless creative possibilities, a common plugin order looks like this:
- Channel EQ
- Compressor
- Saturation
- Delay
- Reverb
This arrangement keeps your processing clean and logical while producing reliable results for most instruments.
As you gain experience, don’t be afraid to experiment with different plugin orders.
Step 10: Save Your Channel Strip
Once you’re happy with the sound, it’s time to save your work.
At the top of the Channel Strip, click the Setting menu.
Choose:
Save Channel Strip Setting As…
Give your preset a descriptive name.
Examples include:
- Piano – Warm Worship
- Piano – Bright Studio
- Cinematic Strings
- Ambient Pad
- Ethnic Flute
- Soft Lead
- Worship Keys
Click Save.
Your Channel Strip is now permanently available inside Logic Pro X.
Step 12: Load Your Channel Strip in Future Projects
The next time you create a project, there’s no need to rebuild your sound.
Simply:
- Create a Software Instrument Track
- Click the Setting menu
- Navigate to User Channel Strip Settings
- Select your saved preset
Within seconds, every plugin and setting will be restored exactly as you left it.
This simple habit can save hours during large production sessions.
Build Your Own Channel Strip Library
As you continue producing music, you’ll naturally develop favorite sounds.
Organize them into categories such as:
Piano
- Worship Piano
- Bright Piano
- Soft Piano
- Cinematic Piano
Strings
- Warm Strings
- Wide Orchestra
- Cinematic Ensemble
Pads
- Dream Pad
- Ambient Pad
- Atmospheric Pad
Leads
- Vintage Lead
- Mono Synth
- Worship Lead
Ethnic Instruments
- Sarangi Warm
- Bansuri Airy
- Santoor Bright
- Sitar Solo
- Shehnai Classic
A well-organized preset library dramatically speeds up your workflow and helps maintain consistency across every project.
Common Mistakes Beginners Should Avoid
Many new producers unknowingly make their mixes more complicated than necessary.
Avoid these common pitfalls:
- Adding too many plugins
- Overusing reverb
- Applying excessive compression
- Boosting every EQ frequency
- Forgetting to save presets
- Using confusing preset names
Remember that a great mix usually comes from thoughtful decisions, not from using more plugins.
Final Thoughts
Creating custom Channel Strips is one of the simplest habits that can transform your music production workflow. Instead of reinventing your sound every time you start a new project, you can build a personal library of professionally crafted presets that are always ready to use.
Start by creating just a few essential Channel Strips for your most frequently used instruments. As your experience grows, so will your collection of custom sounds. Over time, you’ll develop a unique sonic identity that reflects your personal production style while working faster and more efficiently than ever before.
Whether you’re producing worship music, cinematic scores, orchestral arrangements, or commercial sample libraries, mastering Channel Strips in Logic Pro X is an investment that will pay dividends in every future project.
About the Author
Passionate about music production and sound design, we create professional Logic Pro X resources, premium channel strips, Kontakt libraries, and production tutorials to help musicians, composers, and producers achieve studio-quality sound with confidence. Stay tuned for more Logic Pro X tips, workflow guides, and sound design techniques.